
This cherry pie recipe has a thick, almond-scented filling and a flaky, all-butter homemade crust. It's delicious with fresh or frozen cherries!
Jump to Recipe


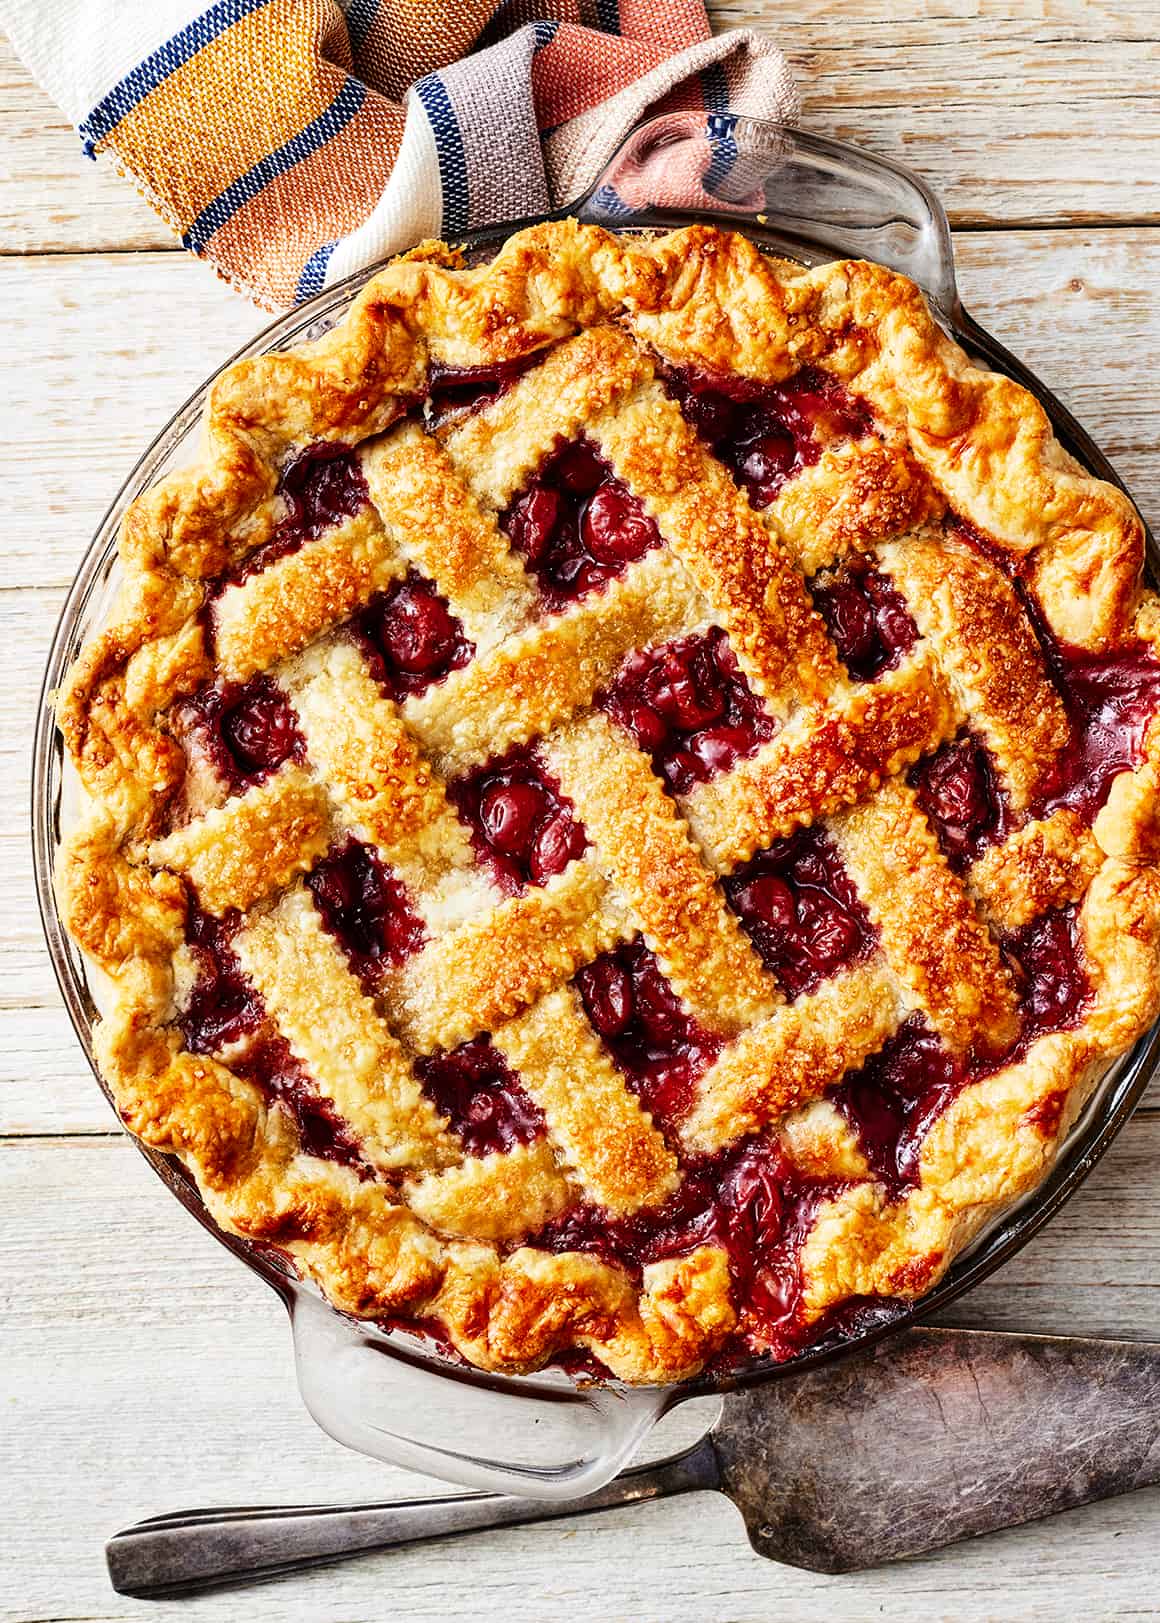
This cherry pie recipe has a flaky, buttery crust and a velvety filling with a touch of almond flavor. The cherry juices thicken on the stove before baking, so the filling sets up with a perfect sliceable texture and the crust gets golden brown and crisp. (No soggy bottom here!) This pie works beautifully with fresh or frozen cherries, so you can make it after summer cherry picking or for a special treat at any time of year.
Overall, this cherry pie recipe is simple to make, but heads up: it does take some time. The pie dough has to chill and the filling has to cool before you can assemble and bake the pie. If you want to get ahead, you can make both the crust and the filling a day or two in advance—find my tips in the post below!
Our Cherry Pie Recipe
Phoebe and I both love cherry desserts, so we always wanted to create a cherry pie recipe for the blog. Phoebe swore by her grandma’s—she grew tart cherries on her farm for years, and homemade cherry pie was a family summer tradition. We used that recipe as a starting point, adapting it to work perfectly with our homemade pie crust. We tested it 6 times to get it just right, and we couldn’t be happier with the thick filling and crisp texture of the crust. I hope you love it too!

Cherry Pie Ingredients
Here’s what you’ll need to make this homemade cherry pie recipe:
- Cherries, of course! Tart cherries (also called sour cherries) are my #1 pick for pie. Their sour flavor adds delicious brightness to the filling. You can use sweet cherries if you prefer, but you may want to add a squeeze of lemon juice to the filling to balance the extra sweetness. Frozen cherries are a great option for pie filling because they’re readily available year-round and come pre-pitted. When fresh cherries are in season, they’re wonderful too. You’ll need 2 pounds after you pit them, about 5 cups.
- Cornstarch and water – They create a slurry that thickens the cherry pie filling, giving it a glossy, jammy texture.
- Cane sugar – It sweetens the filling.
- Cinnamon and ground ginger – For warm depth of flavor.
- Almond extract – Cherry + almond are a perfect pairing. If you don’t have almond extract on hand, vanilla extract is a good substitute.
- Pie crust – I love my flaky, buttery homemade pie crust, but you could substitute store-bought pie dough in a pinch.
- An egg – You’ll beat it with a little water to make an egg wash for the crust, which helps it brown in the oven.
- Coarse sugar – Optional, but delicious. It adds sparkle and sweetness to the top of the crust.
- And vanilla ice cream – For serving. Homemade whipped cream would be wonderful too!
Find the complete recipe with measurements below.

How to Make Cherry Pie Filling
The key to making a great cherry pie filling is thickening the cherry juices on the stove before you add the filling to the pie. This easy step will minimize the amount of juice that seeps into the crust and makes it soggy. It will also help the pie slice nicely once it cools. Here’s how I make my filling:
- Start with 2 pounds of thawed frozen cherries or pitted fresh cherries. Place the cherries in a strainer set over a bowl to capture their juices. Measure 1 cup of the juice.
- Then, make a cornstarch slurry. In a small bowl, whisk together the cornstarch and water until smooth.
- Next, thicken the juices. Place the cherry juice in a small saucepan and bring to a boil. Stir in the sugar and return the mixture to a boil. Once the sugar dissolves, add the cornstarch slurry and stir until the mixture thickens. It will become clear, smooth, and glossy.
- Finally, mix up the filling. Transfer the thickened cherry juices to a large bowl with the cherries. Stir in the spices, almond extract, and a pinch of salt.
Then, allow the filling to cool completely. This will help keep the pie dough cold before it goes in the oven. Keeping the butter in the dough cold is important for a light and flaky crust.

Assembling the Pie
When the filling has cooled and the pie dough has chilled for two hours or longer, it’s time to assemble the pie!
First, preheat the oven. Arrange a rack in the bottom third of the oven and set a baking sheet on it. Preheat the oven to 425°F with the baking sheet inside it.
Roll out the crust according to the instructions in this pie crust recipe.
To assemble the pie, pour the cooled filling into the bottom crust.

Next, weave a lattice on top. Slice the top crust into 1-inch strips. Arrange 4 or 5 strips crosswise over the top of the pie. Weave 4 or 5 strips through them to make a lattice.

Pull back the strips as necessary to weave.

Trim the edges of the lattice, then fold the edge of the bottom crust up and over it so that the edge of the dough is in line with the edge of your pie plate.

Crimp the dough with your fingers or a fork.

Brush the egg wash onto the lattice. Tip: JUST the lattice! The edges of the dough will brown on their own, so there’s no need to brush it onto them.

Sprinkle on the coarse sugar.
Finally, bake. Place the pie on the preheated baking sheet in the oven. Bake for 20 minutes, then reduce the heat to 375°F and bake until the filling is bubbling and the crust is golden brown.
Allow the pie to cool completely before you slice it, for 3 to 4 hours. It might be hard to resist digging in right away, but allowing the pie to cool fully is crucial for getting a clean slice.

Cherry Pie Recipe Tips
- Keep the pie dough cold. When you bake an all-butter pie crust, you want the butter in the pie dough to melt in the oven, creating gorgeous flaky layers. For the best results, keep the dough cold while you assemble the pie so that the butter doesn’t melt before baking. Make sure to chill it for at least 2 hours before rolling it out!
- Tent the pie with foil if it’s getting too brown. Your cherry pie is ready when the crust is golden brown and the filling has been bubbling for several minutes. If the crust is getting too brown before the filling is bubbling, tent it with foil to minimize additional browning.
- Allow the pie to cool completely before you slice it. If you slice and serve the pie while it’s still warm, the filling will ooze out of the crust. For a clean slice, let it cool completely after you take it out of the oven.
Should you par-bake the crust of a cherry pie?
In this recipe, you don’t need to!
Thickening the cherry juices on the stovetop prevents too much liquid from seeping into the crust as it bakes.
Baking the pie in the lower third of your oven, close to the heat source, helps too. I also like to place the pie on a preheated baking sheet (a tip I learned from Melissa Clark at The New York Times) to jumpstart the browning of the bottom crust.

Storage and Make-Ahead Instructions
To store: This cherry pie is best on the day that it’s baked, but it keeps nicely for up to 3 days. Store it covered at room temperature.
To get ahead: Make the pie dough and the filling in advance. Wrapped tightly in plastic, the pie dough keeps well in the fridge for up to 2 days. Stored in an airtight container in the fridge, the cooked filling keeps well for up to 4.

More Favorite Fruit Desserts
If you love this cherry pie recipe, try one of these fruity desserts next:
- Cherry Clafoutis
- Apple Pie
- Strawberry Shortcake
- Easy Peach Cobbler
- Apple Crisp
- Or any of these 30 Easy Summer Desserts!

Cherry Pie
Ingredients
- 2 pounds pitted tart cherries, thawed if frozen, juices reserved
- ¼ cup cornstarch
- ¼ cup plus 1 tablespoon water
- ¾ cup cane sugar
- ½ teaspoon cinnamon
- ½ teaspoon ground ginger
- ¼ teaspoon almond extract
- Pinch salt
- 1 recipe Pie Crust, chilled at least 2 hours
- 1 large egg
- Coarse sugar, optional
- Vanilla ice cream, for serving
Instructions
- Make the filling. Place the cherries in a strainer set over a bowl to capture the excess juices. Measure 1 cup of the cherry juice.* Save any remaining juice for another use. Transfer the cherries to a large bowl.
- In a small bowl, stir together the cornstarch and ¼ cup of the water until smooth. Set aside.
- Place the 1 cup cherry juice in a small saucepan and bring to a boil. Add the sugar, stir, and return the mixture to a boil. When the sugar is dissolved, add the cornstarch mixture and stir until the juices thicken and become clear and glossy. Remove from the heat and pour over the cherries. Stir in the cinnamon, ginger, almond extract, and salt. Allow to cool completely.
- Assemble the pie. Arrange an oven rack in the bottom third of the oven. Place a baking sheet on the rack and preheat the oven to 425°F with the baking sheet inside it.
- Follow the instructions in the pie crust recipe to roll out the bottom crust, leaving a ½-inch overhang on all sides of the pie plate. Loosely cover with plastic wrap and chill in the fridge. Roll out the remaining pie dough to create the top crust.
- In a small bowl, whisk together the egg and the remaining 1 tablespoon water. Set aside.
- Remove the bottom crust from the refrigerator and pour in the cooled filling. Use a sharp knife or pizza cutter to cut the top crust into 1-inch strips. Evenly space 4 to 5 strips crosswise over the pie. Weave 4 to 5 more strips through the crosswise strips to create a lattice, pulling back the original strips as necessary to weave. Trim the edges of the lattice, then fold the edges of the bottom crust up and over it so that the edge of the dough is in line with the edge of the pie plate. Crimp the dough with your fingers or a fork to seal.
- Brush the lattice with the egg wash and sprinkle with coarse sugar, if using. Place the pie on the hot baking sheet in the oven. Bake for 20 minutes, then reduce the heat to 375°F and bake for 40 to 50 minutes, or until the crust is golden brown and the filling has been bubbling for several minutes. If the edges of the crust start to brown too much before the filling is bubbling, tent them with foil.
- Allow to cool completely before slicing and serving, about 4 hours.
- Serve with vanilla ice cream.
Notes






Leave the ginger out, its gross. Ruined the great cherry flavor.
My family said this was the best cherry pie they’ve ever had. I’m making it two weekends in a row per my sister’s request!
My husband wanted cherry pie, his favorite, ,for his birthday last weekend. I make pies so seldom that they’re never quite right. I haven’t made a pie at all in a couple of years. We were having friends over to help celebrate and I was stressed. I researched so many recipes and finally chose this one because Love & Lemons recipes almost always turn out great. I spent a lot of time reviewing all of the notes, suggestions, etc. Then, I followed the recipe without deviation. It took much longer than I had planned on, but it was the best cherry pie that I’ve ever made. I recommend it highly. So delicious! Everyone raved about it. If you’re on the fence, choose this recipe.
Hi Susan, thank you so much for this sweet comment! I’m so glad you loved the pie.
i’m making this today for thanksgiving tomorrow…do i let it sit on the counter or store in the fridge? thank you!!
Hi Paige, let it sit on the counter. I hope you enjoy!
How far in advance of serving can this pie be made? Two or three days ahead? Day before?
Hi Elsa – up to 3 days. I hope you enjoy!
Can you substitute honey or monk fruit sweetener in place of the sugar in this recipe?
Hi Laurie, not in this particular recipe because it’ll throw off the balance of liquids.
This is impossible to read from all the ads, which is a shame!
I’ve been following your recipes, your talents and skills always makes me inspired ❤️
I tried this recipe for Thanksgiving since Cherry pie is a favorite. I followed the instructions exactly and the filling was so tart. I added more sugar and some sugar to the top, but still most people wouldn’t eat it because it was too tart. I picked and froze the tart cherries myself so they were fresh and generated enough juice. any suggestions?
Hi how would I change the cooking time of I wanted to use a graham cracker crust instead?
Hi Christine, hmm great question! We’ve never tested this recipe with a graham cracker crust, but I can give you my best guess. The timing will depend on what you use as a topping for the pie. A crumble like the one from our apple crisp recipe would work well. If you do that, I would bake the pie uncovered at 375°F for 30 to 45 minutes, or until the topping is browned. I hope this helps!
Can I use granulated sugar instead of cane?
yep!
Looks yummy! If you don’t want to waste an egg, you can rub a lump of ice cream over pie crust to give it a nice glaze.
Interesting tip, Gloria! I’ve never heard that before. I’ll have to try it sometime!
This is the second time I’ve made this pie. It is delicious and I used canned tart cherries from Door County that are tart and in juice. It works fantastic!! Great recipe.
Hi Irene, I’m glad you’ve loved it so much!
I can’t find frozen tart cherries in my area. What about canned tart cherries. that is the closest I can find.
KP in Oakland, CA
Hi Kathy, canned should be fine as long as you follow the juice amounts in the recipe.
Can I use vanilla instead of almond? And can I use honey instead of sugar?
Hi Aj, you can use vanilla instead of almond, but I wouldn’t use honey instead of sugar – I think it would be too runny here.
The best cherry pie recipe I’ve ever made! The crust was so flaky and delicious and the filling held together really well after letting it cool for 4 hours. I really liked the addition of the spices in the filling. Would recommend!
How many cups is 2 pounds? I only could find a 5 pound bag. Also are the cherries supposed to be frozen? Or should I thaw them to get the juices. Thank you
Hi I can’t find tart cherries. How is it with regular ?
Hi Ivona, it’s great with regular sweet cherries too.
This was delicious! I thought the cinnamon was going to be too strong but it leveled out after baking. Our new favorite!
Thanks for sharing:)
I look forward to trying this! If I wanted to add brandy, what step would I add it and how much?
Hi Natasha, We haven’t tried this, so I can’t guarantee the results, but you could add 2 tablespoons of brandy to the filling along with the almond extract and spices. If you try it, let us know how it goes!